
ads
Step 1: Signing Up for Blogger

1. Go to www.blogger.com
2. Enter your Google Email and password into the Sign In box on the right side of the screen.
3. Click Sign In
Optional: If you do not want your name on your blog, click Switch to a limited Blogger Profile
4. Confirm Profile by clicking the Continue to Blogger button at the bottom of the screen.
Step 2: Video
This video will explain the basics of how to find your way around the Blogger website
Click the link provided to be brought to the video
Attachments

Step 3: Creating a Blog

1. Click the New Blog button. The Create a New Blog window should appear.
2. Type in a title for your blog in the Title box
3. Type in a short address that relates to your blog's title in the Address box.
Important! If the address is already taken you will see a yellow box with an exclamation point. If the address is available, you will see a blue box with a check mark.
4. Select a template from the options provided by clicking on one. When a template is selected, it will have a blue box around it.
You must select a default template for now, but you will be able to customize it later.
5. Click Create Blog button.
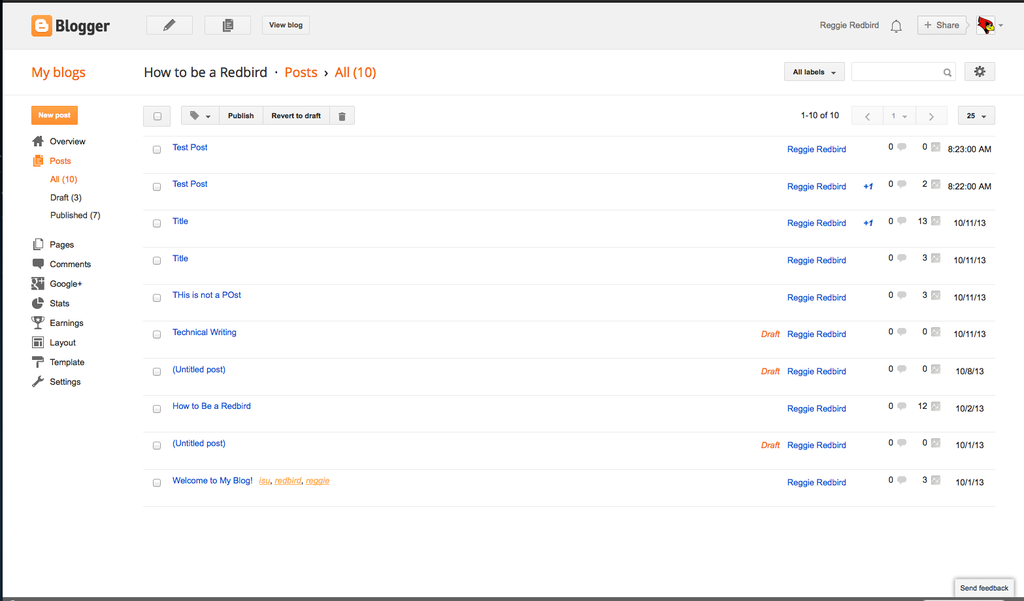
Step 4: Creating a Post

1. Click the button with pencil on it. When you hover over it it should say Create New Post.
2. Type a title for your post in the post box
3. Type up a post in the post field below the post box
Step 5: Using the Toolbar

Going in order from left to right
1. Click to undo changes in your post
2. Click to redo changes you undid.
3. Click to change the font of your post.
4. Click to change the text size
5. Click to make text into a heading, subheading, or minor heading
6. Click to bold text
7. Click to italicize text
8. Click to underline text
9. Click to strikethrough text
10. Click to change the color of your text
11. Click to highlight your text
12. Click to make text into a link
13. Click to insert a photo. A Select A File window should appear.
Click the Choose File button. A File Upload window should appear
Select a photo from your computer and click Open
Click the Add Selected button.
14. Click to insert a video. A Select A File window should appear.
Click the Choose a video to upload button. A File Upload window should appear.
Select a video from your computer and click the Open button.
15. Click to insert a jump break
16. Click to align text.
17. Click to number your text.
18. Click to bullet your text.
19. Click to format a quote.
20. Click to remove any formatting on your text.
21. Click to check the spelling on your post.
Step 6: Using the Post Settings Menu

This menu is located to the right of the post field.
1. To add labels to your post click the Labels tab to expand it.
Then type labels into the text box and click Done
These labels will be words readers can search for your post with.
2. To schedule a time for your post to go live, click the Schedule tab to expand it.
Then choose Set Date and Time from the menu by clicking the circle next to it.
Then select a date and time for the post to go live.
You can do this by either typing in a date or selecting one from the calendar.
Then click Done.
3. To customize your permalink, click the Permalink tab to expand it.
Then select Custom Permalink by clicking the circle next to it.
Then type in a custom permalink and click Done.
This is now the URL for your post.
4. To add your location, click the Location tab to expand it.
Then type your location into the Search bar and click Search. The map should show you your location.
Then click Done.
5. The Options tab allows you to do many things once expanded
To disallow or allow reader comments, choose the preferred option by clicking the circle next to it.
To change the compose mode, choose the preferred option by clicking the circle next to it.
To change the way line breaks are made, choose the preferred option by clicking the circle next to it.
Step 7: Finishing Your Post
When you are done editing and customizing your post, click the Publish button. Your post is now published to your blog.
Step 8: Editing Your Layout.
This is the screen you are brought to after publishing your post. Select Layout from the menu on the left side.
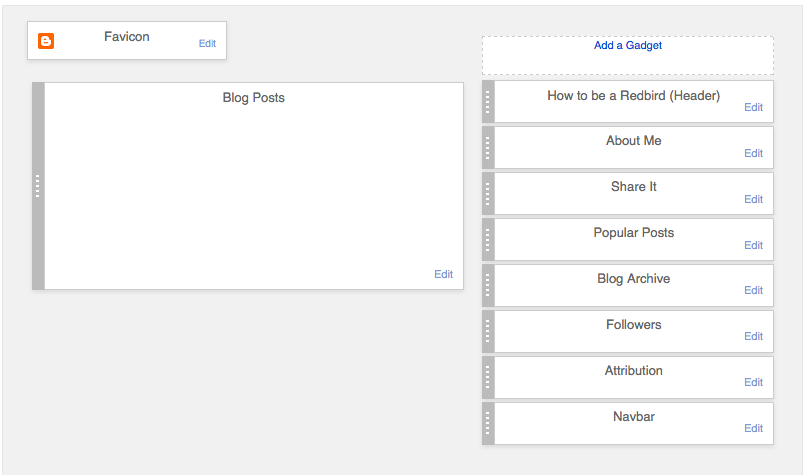
Step 9: Adding a Gadget

A Gadget allows your blog readers to interact with your blog. Choose the ones you believe will most attract and benefit your followers.
1. Click any blue Add a Gadget button to select a new Gadget.
Keep in mind that the location of the Add a Gadget button that you click on is where the Gadget will appear on your blog.
2. You can choose from Basic Gadgets, More Gadgets, or Add Your Own.
Basic Gadgets are the most popular Gadgets created by the Blogger website.
More Gadgets are usually created by other bloggers and have been found useful by many others.
Add Your Own is a feature which allows you to create your own custom Gadget by entering a URL.
3. When you've found the Gadget you want, click the blue plus button on the right to add the Gadget to your blog.
Step 10: Configuring a Gadget
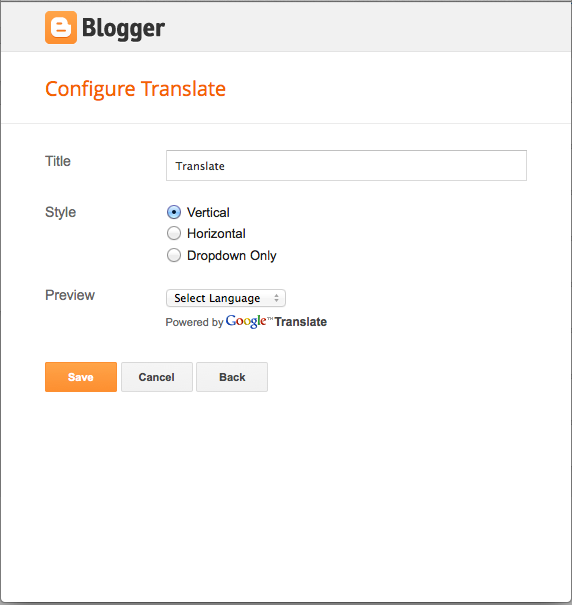
When you click Edit on a Gadget, the Configure box pops up. This box allows you to rename the gadget and many other things depending on which Gadget you are editing.
Step 11: Rearranging Gadgets
The Gadgets with a dark grey bar on the right edge are movable.
Click and drag the Gadget that you want to move.
Keep in mind that other Gadgets may be moved due to where you drag the selected Gadget.
Click Save arrangement on the top right to save changes made to the layout.
Step 12: Removing a Gadget
1. Click Edit in the bottom right corner of the Gadget.
2. Click the Remove button.
Step 13: Social Media

There are Gadgets available that allow your followers to share your blog posts on other social media networks. This is an important feature to help your blog reach as many people as possible.
1. Click Add a Gadget
2. Choose More Gadgets
3. Select one of the Share It Gadgets.
Step 14: Editing Template


1. From the menu on the left side of the page, select Template
2. Select Customize under the preview titled Live on Blog
Here is where you can change the template from the one you chose at the beginning. For the purpose of this tutorial, please choose the first option given after choosing Dynamic Views from the groups at the top.
Step 15: Editing Background
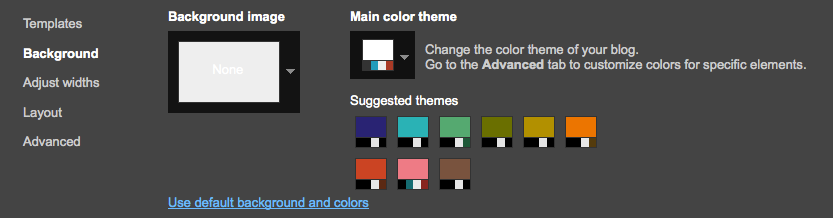
1. Select Background from the menu at the top left of the page. It should be located directly under Templates.
2. To change the background image, hit the down arrow under Background image and choose your preferred image.
3. To change the color theme of the entire blog, hit the down arrow under Main color theme or choose one of the Suggested themes.
Note: The main color theme feature is not available for all templates. If it is unavailable, you will get a message telling you so under Main color theme.
Step 16: Adjusting Widths

This tab on the menu is located directly under Background.
There are two ways you can adjust the widths of the entire blog and of the right sidebar.
1. You can use the slider provided for you, or
2. You can enter in exactly how many pixels wide you want it to be.
Step 17: Advanced Editing
This tab is located at the bottom of the menu at the top left, directly under Layout.
This tab opens another menu, which will hereafter be referred to as the Advanced Editing Menu.
The reason we asked you to choose a specific template is because each template provides a different set of options and tabs in the Advanced Editing Menu.
This is where you can customize the template you selected.
Step 18: Advanced Editing 2

The tabs on the Advanced Editing Menu allow you to change the color and font of certain items.
1. The Page Text tab will allow you to change the color of your text and the background of the posts. It will also allow you to change the font of your entire blog (except for the posts).
2. The Header tab allows you to change the color of the background of the header
3. The Header Bar tab allows you to change the color of the background of the header bar, the color of the text in the Header bar, and also change the font of the text in the Header Bar.
4. The Links tab allows you to change the color of links before they've been visited, after they've been visited, and while the reader is hovering his or her cursor over the link.
5. The Blog Title tab allows you to change the color and font of your blog title.
6. The Blog Description tab allows you to change the color and font of your blog description
7. The Post Title tab allows you to change the color and font of the titles of your posts
8. The Date Ribbon tab allows you to change the color of the date ribbon next to each post.
Step 19: Congratulations!
Now you know how to use Blogger.com to make yourself a personal or professional blog, and how to style the blog to your liking
HOW TO EARN
Register for AdSense (If You Have Not Done So Already)
:max_bytes(150000):strip_icc():format(webp)/Blogger5-57203fc13df78c564004f137.png)
Before completing the rest of these steps, you must link your AdSense account to your Blogger account. In order to do that, you must have an AdSense account. Unlike many other Google services, this isn't one that comes automatically with registering for an account.
Go to www.google.com/adsense/start.
Registering for AdSense isn't an immediate process. AdSense will start appearing on your blog as soon as you register and link the accounts, but they will be ads for Google products and public service announcements. These do not pay money. Your account will have to be manually verified by Google in order to be approved for full AdSense use.
You will need to fill out your tax and business information and agree to AdSense terms and conditions. Google will verify that your blog is eligible for AdSense. (That it doesn't violate terms of service with things like obscene content or inappropriate items for sale.)
Once your application is approved, your ads will change from public service ads to paying contextual ads if any are available for the keywords on your blog.
Go to the Earnings Tab
:max_bytes(150000):strip_icc():format(webp)/Blogger6-572042743df78c564004f56f.png)
Ok, you have created both an AdSense account and a Blogger blog. Maybe you're using a Blogger blog that you've already established (this is recommended - you don't actually earn much with a low traffic blog you just created. Give it some time to build up an audience.)
The next step is to link the accounts. Go to the Earnings settings on your blog of choice.
Link Your AdSense Account to your Blogger Account
:max_bytes(150000):strip_icc():format(webp)/Blogger7-572042c15f9b58857db8b114.png)
This is a simple verification step. Verify that you want to link your accounts, and then you can configure your ads.
Specify Where to Display AdSense
:max_bytes(150000):strip_icc():format(webp)/Blogger8-5720431c5f9b58857db8b118.png)
Once you've verified that you want to link your Blogger to AdSense, you'll need to specify where you want ads to display. You can place them in gadgets, between posts, or in both places. You can always go back and change this later if you think you have too many or too few.
Next, we'll add some gadgets.
Go to Your Blog Layout
:max_bytes(150000):strip_icc():format(webp)/Blogger3-57203ebe3df78c564004ef62.png)
Blogger uses gadgets to display informational and interactive elements on your blog. To add an AdSense gadget, go first to Layout. Once in the layout area, you'll see the areas designated for gadgets within your template. If you don't have any gadget areas, you'll need to use a different template.
Add the AdSense Gadget
:max_bytes(150000):strip_icc():format(webp)/Blogger4-57203f7c3df78c564004f130.png)
Now add a new gadget to your layout. The AdSense gadget is the first choice.
Your AdSense element should now appear on your template. You can rearrange the position of your ads by dragging the AdSense elements to a new position on the template.
Be sure to check with AdSense Terms of Service to make sure you don't exceed the maximum number of AdSense blocks you're allowed.


0 Comments